Hey guys,
I have studied changers up and down from what I could find and Some things just aren't getting across to me . Does anybody have a changer finger assembly that they could take a picture of and explain the raising and lowering. I have seen the steel guitar.com diagrams a thousand times and it never makes sense to me how the raise rod can pull the finger when the Rivet is located where it is on the drawing. What style fingers are modern builders using? Thanks
Changer Explanation
Moderator: Dave Mudgett
-
Jeff Metz Jr.

- Posts: 1779
- Joined: 2 Mar 2011 1:46 pm
- Location: York, Pennsylvania, USA
Changer Explanation
Mullen G2 SD10 , Lil Izzy Buffer, Goodrich 120 volume pedal, Boss DD-7, Peterson Strobo flip, Peavey Nashville 112
-
Georg Sørtun

- Posts: 3854
- Joined: 2 Jun 2009 9:12 am
- Location: Mandal, Agder, Norway
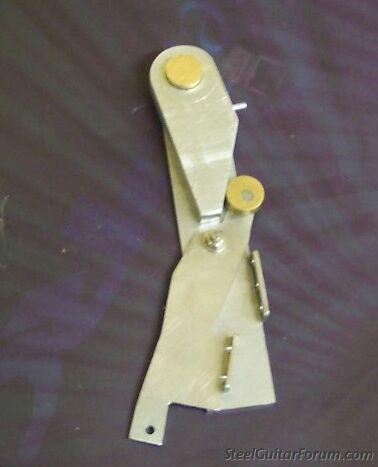
Is it this that you find difficult to understand... ?
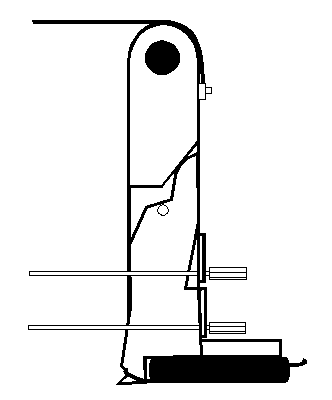
Think this is the most used configuration on All-Pull PSGs today - what's called "Wraparound Raise Finger" on the http://steelguitar.com/maps/changer.html page.
The raise-scissor uses the top of the lower-scissor to push the finger back for a raise against the string-tension.
This works because the raise- and lower-scissors are (loosely) riveted together where it shows on the drawing - acting as a "pull-point", and because the lower-scissor is held in place against the stop-plate at the bottom by the lower-return-spring during a raise - lower-scissor pivots against the edge on the stop-plate.
With string-tension in place it is a ballancing act between "length-of-scissors" above and below the rivet, and the tension on the lower-return spring.
-
Ian Worley

- Posts: 2410
- Joined: 14 Jan 2012 12:02 pm
- Location: Sacramento, CA
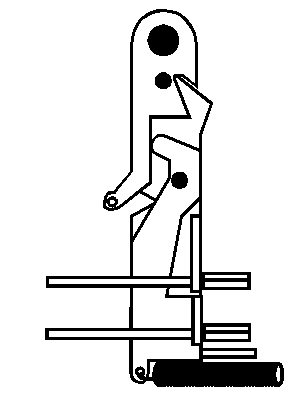
The images you mentioned illustrate the geometry and function pretty clearly:

http://steelguitar.com/maps/changer.html#
The changer is held in equilibrium by the opposing tension of the strings and the lower return springs. The scissor is a compound lever that isolates these two opposing forces. The changer axle is in a fixed position but the two rivets move in a compound motion with the action of the scissor so the scissor is pivoting in three different places simultaneously.
The most important part is the little rounded cam nub on the top end of the lowering scissor (just above the lowest rivet). This is what determines whether the finger is raising, lowering or resting in equilibrium. It is always in contact with the back of the finger, either pushing it like the first pic and resisting the tension of the strings (to raise pitch), relaxing it like the second pic, resisting the tension of the return springs to allow string tension to pull it back (to lower pitch), or just sitting in the middle "open" position where string and spring tension are in equilibrium.
EDIT - I see Georg slipped a reply in while I was typing, but a slightly different way of explaining it. The same concept applies to either style of finger, the point of contact between the lower scissor and the actual finger is where the action is
-
J R Rose
- Posts: 2760
- Joined: 13 Mar 2009 12:39 pm
- Location: Keota, Oklahoma, USA
-
Brint Hannay
- Posts: 3957
- Joined: 23 Dec 2005 1:01 am
- Location: Maryland, USA
A potential Achilles heel of later model Sho-Buds is that the actual finger is made of relatively soft, porous pot metal, and therefore the rubbing at the contact point can, depending on the luck of the individual finger's composition, wear a substantial groove in the finger and make the lower function not work correctly.Ian Worley wrote:the point of contact between the lower scissor and the actual finger is where the action is
Even without that added shortcoming, it would seem that minimizing friction at that point would be an optimal design goal.
Which makes me wonder why it isn't universal to put a roller bearing at that point. I know a few builders, either steel guitar companies or after-market ( I know John Coop made changer assemblies with such roller bearings ) do use them, or have used them.
Who else, other than Coop, uses the roller bearing at the critical contact point?
-
Georg Sørtun
- Posts: 3854
- Joined: 2 Jun 2009 9:12 am
- Location: Mandal, Agder, Norway
-
Jeff Metz Jr.
- Posts: 1779
- Joined: 2 Mar 2011 1:46 pm
- Location: York, Pennsylvania, USA
-
Georg Sørtun
- Posts: 3854
- Joined: 2 Jun 2009 9:12 am
- Location: Mandal, Agder, Norway
The raise-scissor (raise-finger if you like) is - in the figure I used - "wrapped around" and rotates on the changer shaft, and it therefore doesn't matter where down along the length of the raise-scissor the pull-rod pulls on it since it will always pull below that shaft rotating point.
The "trick" is that it (the raise-scissor / raise-finger), when moving back, will pull on the lower-scissor (lower-finger) through the rivet point, thus make the top of the lower-scissor push the finger for a raise.
A few PSGs have changers with "intermixed raise and lower holes for pull-rods" (Excel comes to mind), using the varying leverage and thereby varying "gear-action" up and down the raise- and lower-scissors for better balancing of raises, lowers and splits.
-
Clark Doughty

- Posts: 1054
- Joined: 15 Jul 2010 8:33 am
- Location: KANSAS
Changer Explanation
Ian, best explanation and illustration I've ever seen of this. Thanks for posting.........cd
-
John Swain

- Posts: 1621
- Joined: 12 Feb 2000 1:01 am
- Location: Winchester, Va
-
Stuart Tindall
- Posts: 53
- Joined: 23 Sep 2008 7:02 am
- Location: England, UK
-
Lane Gray

- Posts: 13680
- Joined: 4 Aug 1998 11:00 pm
- Location: Topeka, KS
The brain-bending bit is that, when you pull the raise scissor, the lowering scissor is held against the stop bar by the return spring, so pulling the raise scissor still invokes the pivot, but it still pulls it sharp.Jeff Metz Jr. wrote:I guess the top pic is what confuses me. It seems like the raise finger wouldn't move forward if its being pushed below the rivet. Maybe im missing it.
Bruce showed it to me several times in his shop, but it never stayed with me until I rebuilt my first MSA.
2 pedal steels, a lapStrat, and an 8-string Dobro (and 3 ukes)
More amps than guitars, and not many effects
More amps than guitars, and not many effects
-
Jim Pitman
- Posts: 2043
- Joined: 29 Aug 1998 12:01 am
- Location: Waterbury Ctr. VT 05677 USA
Speaking of the wrap around raise scissor, it works OK but I tell you what, it's capable of generating alot aluminum dust which turns into a slurry after a few years if you properly lubricate your changer.
I just cleaned a changer from a 10 year old guitar. I put all the pieces in a 5 gallon bucket, then sprayed them with brake cleaner. I didn't get around to cleaning the bucket until a week later. The brake cleaner had evaporated (in my garage) leaving about a teaspoon of oily aluminium. Thats alot.
I respect the manufacturers wanting to keep things simple ($) and this maybe the reason not very many have gone to the bearing arrangement. However, I think another way that doesn't increase the cost much, slows down the contamination, and is simpler would be:
Simplify the shape of the aluminium finger so that the bottom is just cut off 90 degrees eliminating the slope. Mill a 1/16" slot in the bottom from the bottom edge up, 1/2" deep centered within the thickness going from front to back completely. Drive a 1/16" dia pin though the thickness of the finger 1/4" up from the bottom intersecting the slot midway on its way to the other side. Put a vertical slot in the the top of the raise scissor that will engage the pin in the raise finger.
In this manner the extreme string tesnion pressure is on two hard metal surfaces, a pin and the scissor, rather than on a softer aluminum surface and the hard scissor. Possibly the friction is reduced too.
Maybe this has already been done anyone?
-
Don Griffiths

- Posts: 498
- Joined: 14 Apr 2010 9:59 pm
- Location: Steelville, MO
duplicate post
""
Last edited by Don Griffiths on 10 Feb 2016 5:22 pm, edited 1 time in total.
Shobud Pro1,BMI U12, Santa Cruz F, PRS Standard, Fender Twin Reverb, ‘53 000-28
-
Don Griffiths
- Posts: 498
- Joined: 14 Apr 2010 9:59 pm
- Location: Steelville, MO
-
Jim Pitman
- Posts: 2043
- Joined: 29 Aug 1998 12:01 am
- Location: Waterbury Ctr. VT 05677 USA
-
Lane Gray
- Posts: 13680
- Joined: 4 Aug 1998 11:00 pm
- Location: Topeka, KS
-
Tony Prior

- Posts: 14711
- Joined: 17 Oct 2001 12:01 am
- Location: Charlotte NC
Jeff Metz Jr. wrote:I guess the top pic is what confuses me. It seems like the raise finger wouldn't move forward if its being pushed below the rivet. Maybe im missing it.
It's two separate pieces, the raise PULL is the same piece as the round bridge where the string lives, the lower finger is a separate piece and free wheels when the raise is pulled, the lowering rod is not effected. If you literally removed the lowering finger/scissor from the rivet ,you would only be able to RAISE the pitch of the string. Picture the assy without the lowering finger. The raise has nothing to do with the rivet, it is pulling the entire finger assy via the CHANGER AXLE.
Emmons L-II , Fender Telecasters, B-Benders , Eastman Mandolin ,
Pro Tools 12 on WIN 7 !
jobless- but not homeless- now retired 9 years
CURRENT MUSIC TRACKS AT > https://tprior2241.wixsite.com/website
Pro Tools 12 on WIN 7 !
jobless- but not homeless- now retired 9 years
CURRENT MUSIC TRACKS AT > https://tprior2241.wixsite.com/website
-
Jim Pitman
- Posts: 2043
- Joined: 29 Aug 1998 12:01 am
- Location: Waterbury Ctr. VT 05677 USA
-
Jim Pitman
- Posts: 2043
- Joined: 29 Aug 1998 12:01 am
- Location: Waterbury Ctr. VT 05677 USA

-
Jim Pitman
- Posts: 2043
- Joined: 29 Aug 1998 12:01 am
- Location: Waterbury Ctr. VT 05677 USA
I wish...just one...only one...pedal steel player was a mechanical engineer with the program "Solid Works" and its' add-on "Finite Analysis".
Within an hour, he/she could draw, put in motion, and simulate a changer design and tell you:
1. travel required to raise or lower to pitch for each string.
2. Friction
3. Force
"Where are you"?.. he said desperately.
Unfortunately, the program costs about 11k$/year.
Within an hour, he/she could draw, put in motion, and simulate a changer design and tell you:
1. travel required to raise or lower to pitch for each string.
2. Friction
3. Force
"Where are you"?.. he said desperately.
Unfortunately, the program costs about 11k$/year.
-
Jerry Jones
- Posts: 852
- Joined: 6 Sep 2007 4:26 pm
- Location: Franklin, Tenn.
Jim, you really wouldn't need a slot in the lowering finger because the constant string tension on the main finger would force the pin against only the back side of that slot.
Zum steels have a great changer design that minimizes the sliding friction between main and the lowering finger. I may have a drawing somewhere?
I wish it was easier to pop a DXF drawing on the net, but it always seems a jump thru too many hoops..... Nice drawing.
Zum steels have a great changer design that minimizes the sliding friction between main and the lowering finger. I may have a drawing somewhere?
I wish it was easier to pop a DXF drawing on the net, but it always seems a jump thru too many hoops..... Nice drawing.
Jerry Jones
-
Georg Sørtun
- Posts: 3854
- Joined: 2 Jun 2009 9:12 am
- Location: Mandal, Agder, Norway
Also, having a slit there will prevent the s.c. "split screw" (lowest lower screw) from working as intended, as the lower-scissor must lose contact with the finger once the finger lands on the screw - otherwise something in the lower-pull-train will break.Jerry Jones wrote:Jim, you really wouldn't need a slot in the lowering finger because the constant string tension on the main finger would force the pin against only the back side of that slot.
-
Ian Worley
- Posts: 2410
- Joined: 14 Jan 2012 12:02 pm
- Location: Sacramento, CA
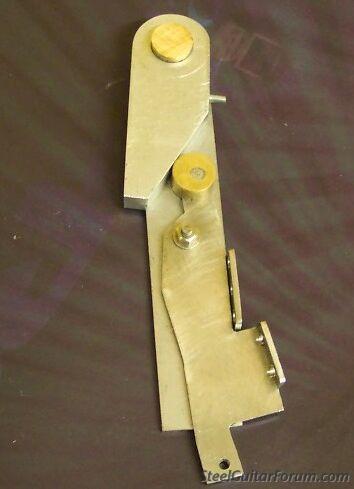
This is incorrect. There is still a separate raise scissor arm in the drawing that Georg posted (it's actually a Carter finger). Instead a pivoting on a rivet just below the changer axle like the other (Sho-Bud style) diagram, it pivots directly on the axle, but they function the same, the raise scissor arm's motion is separate and different from the finger itself. This design has less mechanical advantage (leverage) on the raises than the compound scissor design in the other diagram, but it pulls faster. The bottom line is that the contact between the upper edge lowering scissor and the finger determine which direction the string moves. A two-piece assembly as you describe could work to raise and lower, but you would not be able to split a raise and a lower together like a modern all-pull changer. The raise would dominate, but would not negate the lower like on a push-pull so you would likely end up with some odd note in the middle.Tony Prior wrote:...the raise PULL is the same piece as the round bridge where the string lives, the lower finger is a separate piece and free wheels when the raise is pulled, the lowering rod is not effected. If you literally removed the lowering finger/scissor from the rivet ,you would only be able to RAISE the pitch of the string. Picture the assy without the lowering finger. The raise has nothing to do with the rivet, it is pulling the entire finger assy via the CHANGER AXLE.
-
Jim Pitman
- Posts: 2043
- Joined: 29 Aug 1998 12:01 am
- Location: Waterbury Ctr. VT 05677 USA
Good points Jerry and George. - knock off the front of that lower scissor so the split tuners work without putting undue stress on the pull train.
Another idea to reduce wear would be to glue a hard metal flat on the finger where it contacts the lower scissor.
I kinda like the idea though of increasing the mass of the finger by milling just a slot and using the pin - may have a positive affect on sustain.
Another idea to reduce wear would be to glue a hard metal flat on the finger where it contacts the lower scissor.
I kinda like the idea though of increasing the mass of the finger by milling just a slot and using the pin - may have a positive affect on sustain.